


Are you ready to optimize your WordPress site with WP Rocket?
WP Rocket is the #1 cache plugin for WordPress optimization with a myriad of features that are very complete when compared to other cache plugins, it can perform maximum optimization on images, JavaScript, fonts and others on your wordpress blog so that you will be able to score better on GTmetrix and Google PageSpeed Insights.
This guide will be helpful to you because it has been tested and it is not just a guide that you can follow but shows you how the features function so that you will have a better understanding of choosing the most appropriate settings.
Ideal WP Rocket Setup Settings(Click image to enlarge);
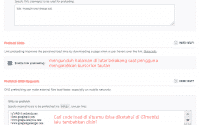

1. Dashboard
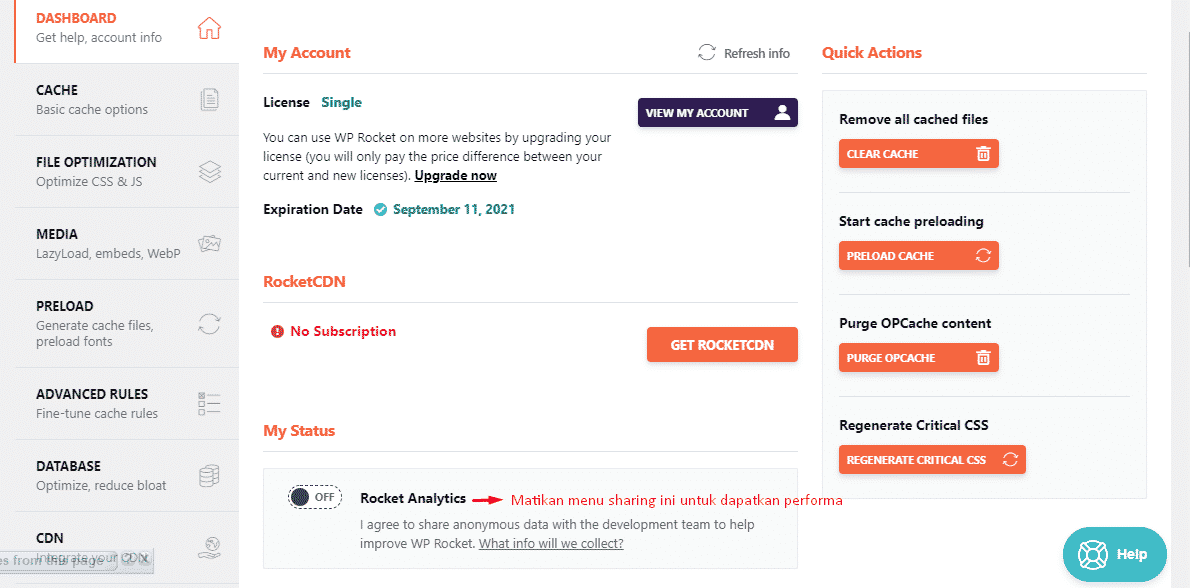
Leave this option disabled unless you are a BETA tester or you want to let WP Rocket collect your data anonymously and this affects performance quite a bit too, the purpose of this data collection is only to find any errors or bugs so that it can be updated in the future for better performance.
2. Cache
This is the best cache setting if you don’t use any additional plugins for your mobile website and don’t allow many users to log into your site like BbPress for example. I myself increased the cache lifetime to 24 so that the cache doesn’t need to be updated as often, and saves a bit of server resources.

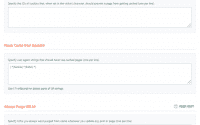
Mobile Cache – this menu aims to enable caching for mobile devices. You should only enable “separate cache files for mobile devices” if you are using a plugin for mobile websites like WP Touch.
User Cache – This is best disabled unless you have quite a few users logged into your website like bbPress for example where there is content specifically for users as this gives each user their own version of the cache.
Cache Lifespan – The purpose of this menu is that if the lower number means that the cache will be refreshed more often but the consequence is that it takes up more of your resource space. If the number is set higher, it means that it is not refreshed as often and this is good for saving your resources. If you are using shared hosting then it is recommended that you set it to 24h is best.
3. File Optimization
All CSS, HTML and JavaScript settings should be enabled individually and you should test your site to see if any errors are visible while enabling these menus. This is the File Optimization setting I use and it gives me the best score in GTmetrix, but you should test your own GTmetrix report to check for errors due to each setting you make as it usually depends on the WordPress theme you are using.
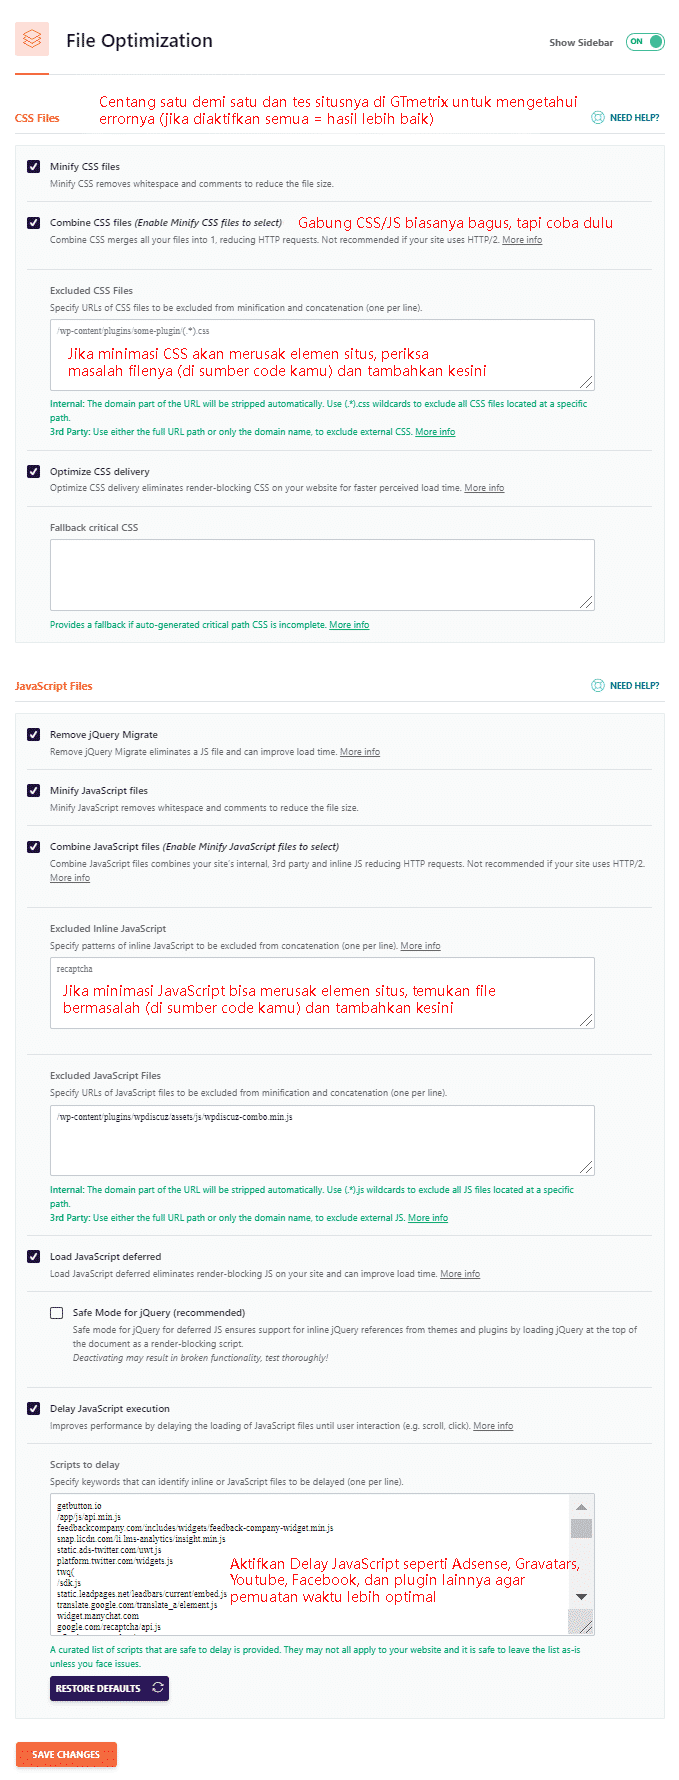
Minify CSS Files – If you have this menu enabled first then immediately go to your site and check if any minification errors are visible after enabling this menu and if you have seen them, look at the source code, search and find the problematic CSS or JavaScript file, and exclude that file from being minified because then you still get the benefit of minification (just not for that file).
Combine CSS & JavaScript – This feature is very good and can be recommended to increase your score in lighthouse but on the other hand it can break your site for that you need to try it first whether your site looks messy after activating this menu! if yes, then you should disable this menu.
Exclude CSS & JavaScript – This option is very useful if you find that your site looks messy after combining CSS and JavaScript then you need to find the problematic code and add it here so that your appearance returns to normal. If you are still confused in this area you can follow the instructions on how to solve the minification problem provided by the WP Rocket team.
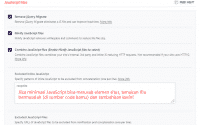
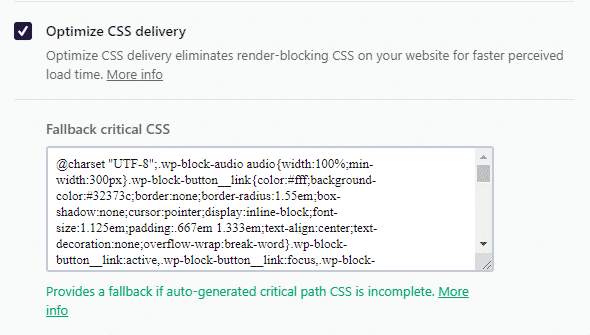
Optimize CSS Delivery – This CSS delivery optimization function is also fairly important for faster page loading but often this feature does not work properly for that you need to follow the steps below to handle it;
- Search for the file “rocket-critical-css” and immediately make sure that the code is working properly
- Go to the PurifyCSS site and enter your domain address and click Clean up CSS
- Download combined, purified, and minified CSS.
- Paste the code in“fallback critical CSS“
- Exclude problematic files from CSS delivery using WP Rocket helper plugin.
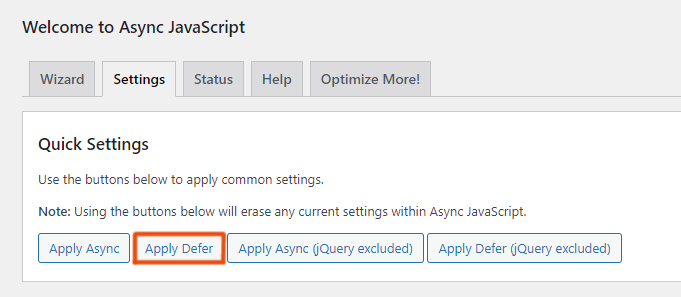
Load JavaScript Deferred – Load JavaScript after the page finishes parsing, it is one of the best ways to eliminate render blocking resources but unfortunately I often find this feature does not run or do its job properly, if you find the same render blocking problem then you need to install Autoptimize and Async JavaScript for better CSS and JavaScript optimization.
Install the Autoptimize plugin with the following settings:

Install Async JavaScript and click“apply defer“
Delay JavaScript Execution – This option can make your site load faster by delaying JS, for example; the JavaScript load is usually comments and gravatar, this makes the site load time longer because JS is not delayed, so you need to apply this option. In addition, you can also use the Flying Scripts plugin because it functions similarly to this option, except that the advantage of this plugin is that it creates a timeout period (in seconds) until the JavaScript is loaded and this is much better. I have been using this plugin until now. You need to test it yourself!
4. Media
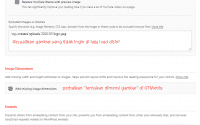
In the options for media optimization it is highly recommended that you check all the options here except in the Lazyload settings why? because if you use YouTube videos embedded on your website in other words embedded YouTube videos by replacing YouTube iframes with preview images then this can cut your site loading time in half because videos are very heavy.

Lazy Load – Delaying the loading of images, iframes, and videos until you scroll your mouse down and make them visible is very beneficial and significantly improves faster page load times.
Add Missing Image Dimensions – This option is very similar to Cloudflare’s hotlink prevention in that it prevents other sites from embedding your content on their site and thus sucking up bandwidth and consuming your server resources.
WebP Caching – You can enable this menu if you use WebP image format on your site, this menu is very good because the images on your site will load faster when compared to the image format in general (PNG & JPG). If you don’t have one you can use the Imagify – Optimize your Images & Convert WebP plugin to convert your images to WebP.
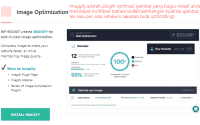
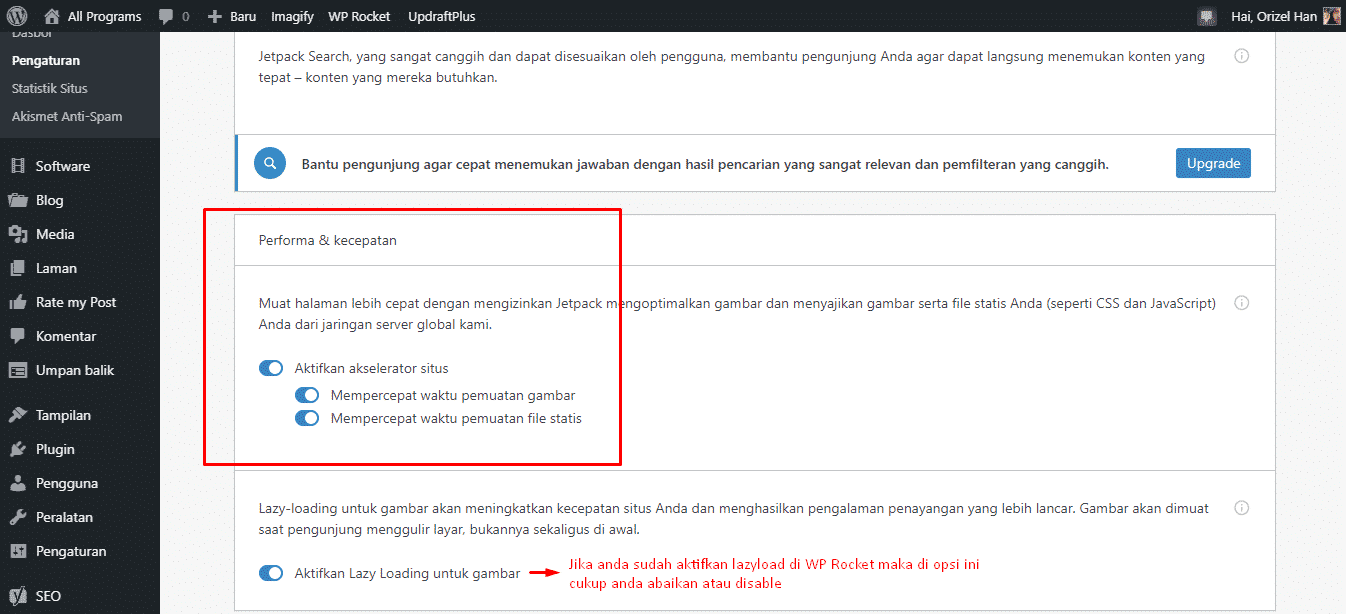
Performance & Speed Optimization Recommendations on Images
For better optimization of images if you are not using webp then you can use the special settings from jetpack below;
5. Preload
If you enable your XML sitemap then Preloading will be done automatically by WP Rocket. Prefetching and preloading fonts is essential for optimizing third-party fonts and scripts which you can find in the Reduce DNS Lookups section of your GTmetrix YSlow report.
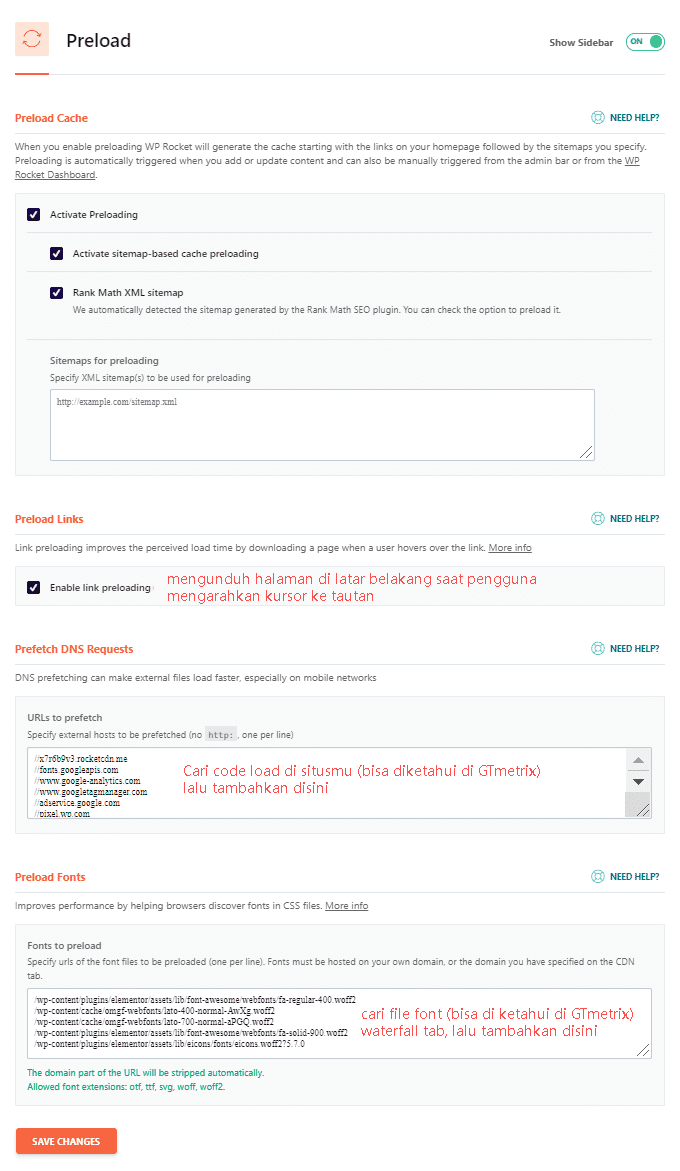
Preload Links – According to a WP Rocket Article that this feature can improve the perception of page load time for visitors navigating your site for example; If a user hovers their cursor over, or touches, a link for 100ms or more, the HTML of that page will be fetched in the background, so that when they actually click on that link, it will appear to load almost instantly!
Prefetch DNS Requests – run your site in GTmetrix then open it in the waterfall tab and copy any third party scripts there such as Google Adsense, fonts, Youtube, even social media then take the code and add it to the Prefetch DNS Requests box. This will help the browser to anticipate these external requests and load them faster.
Or you can copy the code file below and add it to the Prefetch DNS Requests box
//maps.googleapis.com
//maps.gstatic.com
//fonts.googleapis.com
//fonts.gstatic.com
//ajax.googleapis.com
//apis.google.com
//google-analytics.com
//www.google-analytics.com
//ssl.google-analytics.com
//youtube.com
//api.pinterest.com
//cdnjs.cloudflare.com
//pixel.wp.com
//connect.facebook.net
//platform.twitter.com
//syndication.twitter.com
//platform.instagram.com
//disqus.com
//sitename.disqus.com
//s7.addthis.com
//platform.linkedin.com
//w.sharethis.com
//s0.wp.com
//s1.wp.com
//s2.wp.com
//s.gravatar.com
//0.gravatar.com
//2.gravatar.com
//1.gravatar.com
//stats.wp.com
Preload Fonts – copy the font files in GTMetrix in the waterfall tab menu then copy all then paste or paste in Preload Fonts as shown below;

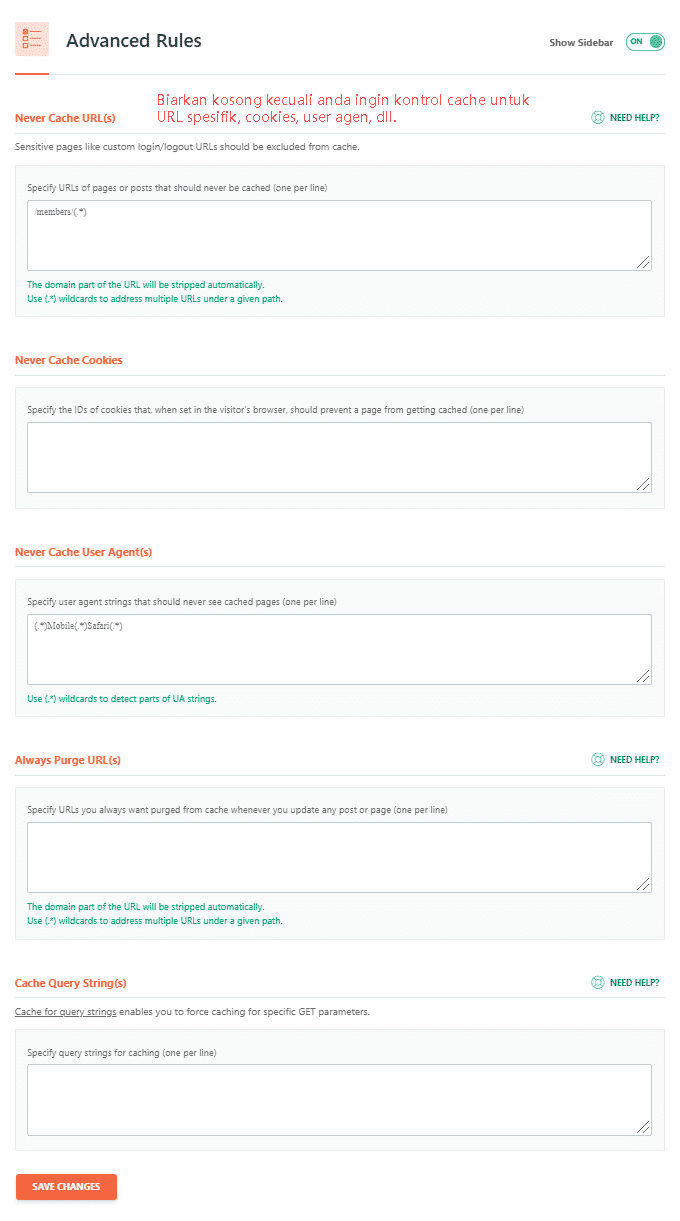
6. Advanced Rules
This option is actually made for eCommerce sites so those of you who are not eCommerce sites can skip this step, and if you are using this WP Rocket plugin for eCommerce sites then you can see the WP Rocket documentation about this setting.
7. Database
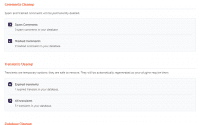
In this menu, you should check all the options here for faster and lighter database optimization.
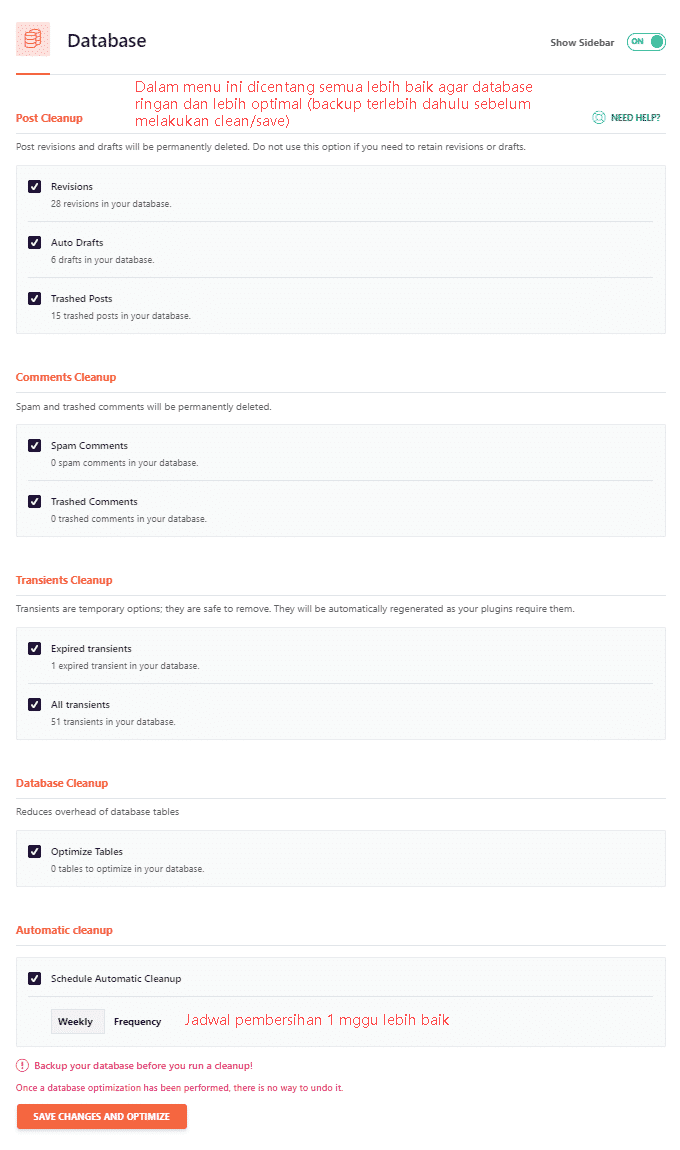
- Revisions – This is the old version of your post that was saved when you hit “Publish”.
- Auto Drafts – These are your unpublished articles that are still stored in drafts.
- Trashed Posts – Articles and drafts that you deleted.
- Spam Comments – Comments that are marked as spam.
- Trashed Comments – Comments that are marked as trash.
- Expired Transients – Transients that have become obsolete and are still embedded in your database.
- All Transients – Stores data that takes a long time to retrieve (e.g. social count on a blog).
- Optimize Tables – Optimize database tables to run more efficiently.
- Automatic Cleanup – How often do you want WP Rocket to clean and optimize your database.
Recommendation
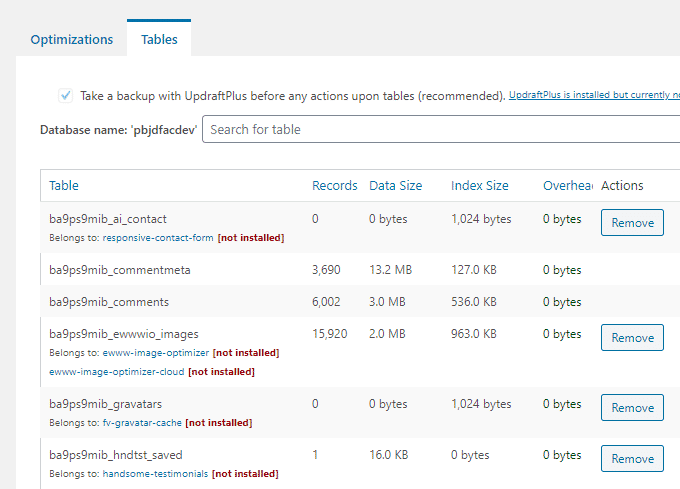
In addition you need to delete old tables in the database when you have installed plugins that are no longer used on your site and of course this makes your database heavy and quite affects the performance of your site for that I recommend that you install the WP-Optimize plugin and check your tables frequently especially if you delete plugins.
One of the example images below that shows “[not installed]” is a legacy table of old plugins that have been uninstalled, you need to remove it if the plugin is no longer used so that your database works better.
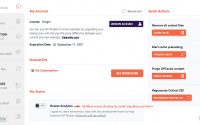
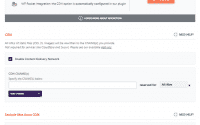
8. CDN
CDN or commonly called Content Delivery Network is great for those of you who have visitors from outside who reach very far from the origin of your server so as to reduce the geographical distance between the server and your visitors.
There are 3 good CDNs for you to use;
- Cloudflare – This is free but not quite a CDN as Cloudflare does not serve assets from CDN URLs. Using this service is perfect for small or personalized websites.
- RocketCDN – This is a paid CDN offered directly from WP Rocket and is easy to auto-configure, it comes from the StackPath data center but RocketCDN doesn’t always work well and can really increase TTFB.
- BunnyCDN – This CDN is higher performing and integrated with WP Rocket so it’s very easy to set up. If you have the budget then this CDN is perfect for you.(RECOMMENDED)
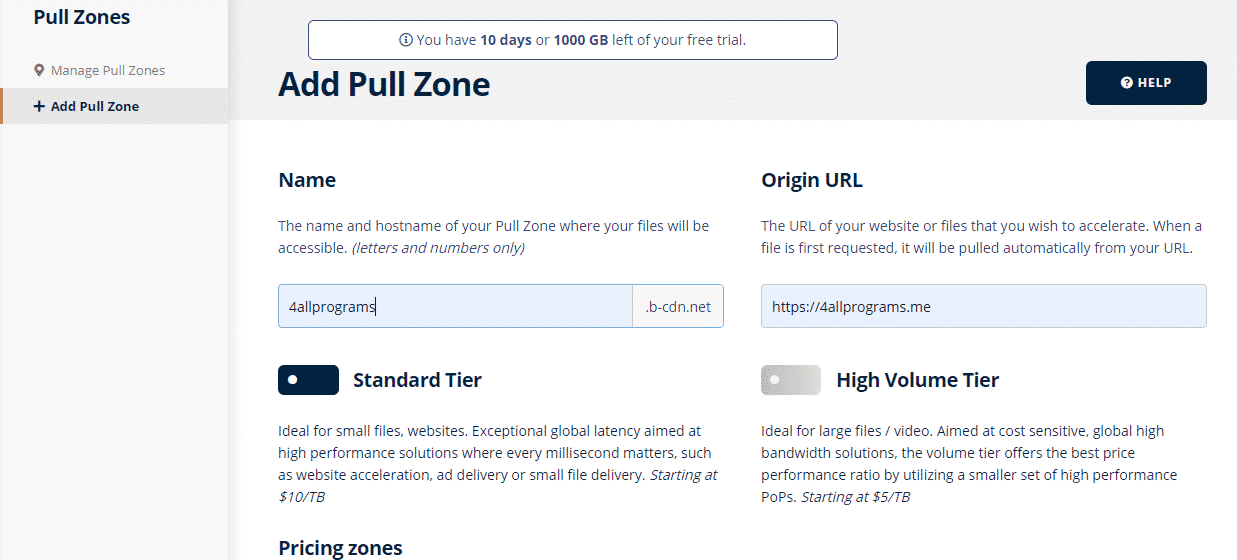
BunnyCDN setup
Step 1: On the pull zones menu click + Add Pull Zone then you enter your URL Name and Origin there.
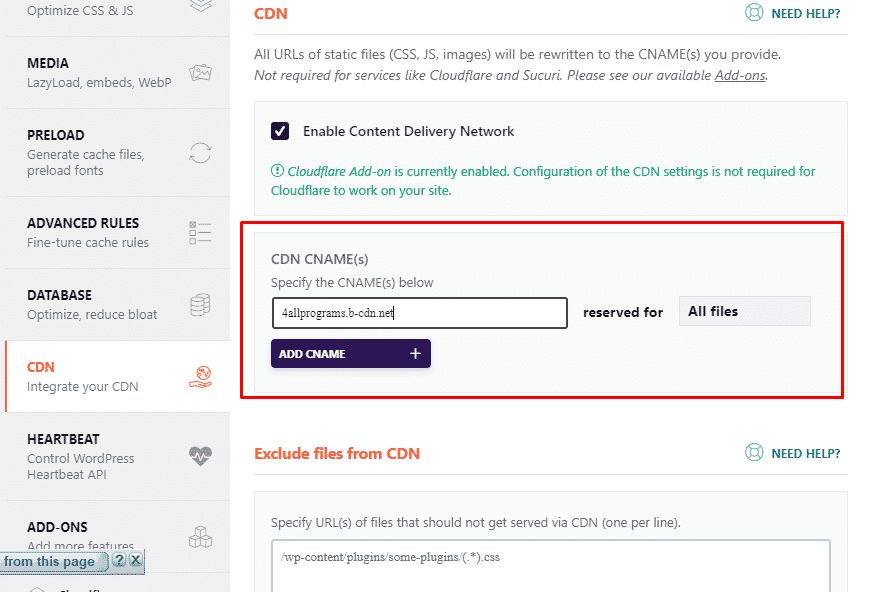
Step 2: Copy and paste the hostname you got from BunnyCDN into the WP Rocket CDN menu option as shown below and save.
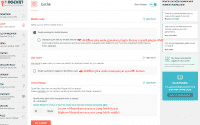
Cloudflare CDN Settings
If you are using Cloudflare’s CDN service then enable the add-ons and click on “Modify Options” to perform advanced Cloudflare settings.
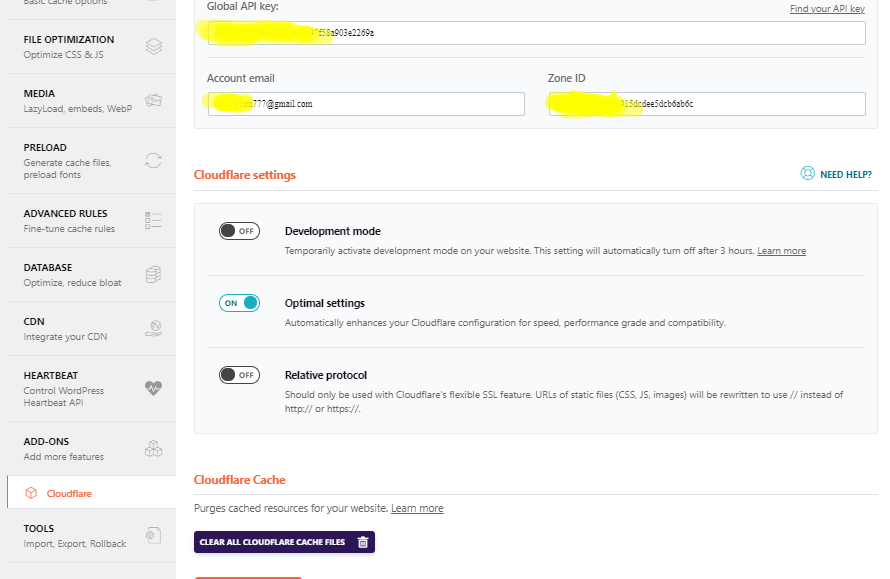
You can follow the example settings above and to get the Global API Key and Zone ID you can get it on your cloudflare dashboard. If you have activated the optimal settings then save and the last step of this setting is to click “Clear cloudflare cache files”.
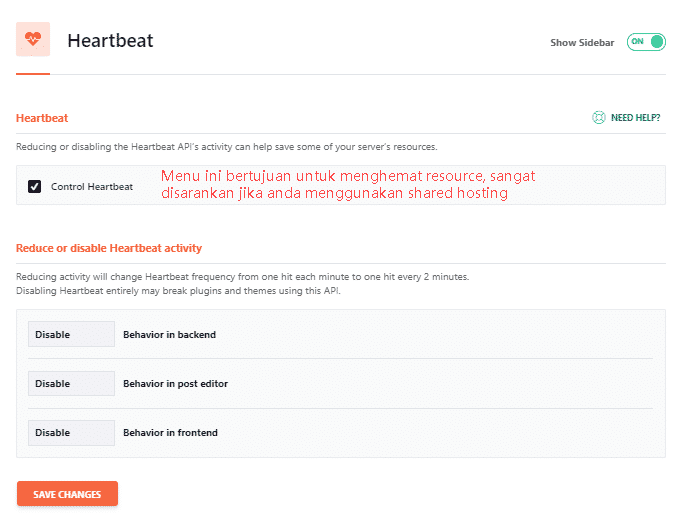
9. Heartbeat
This feature is useful for saving your resource usage so as not to overload it is highly recommended that you activate this option especially for those of you who use shared hosting services and not VPS.
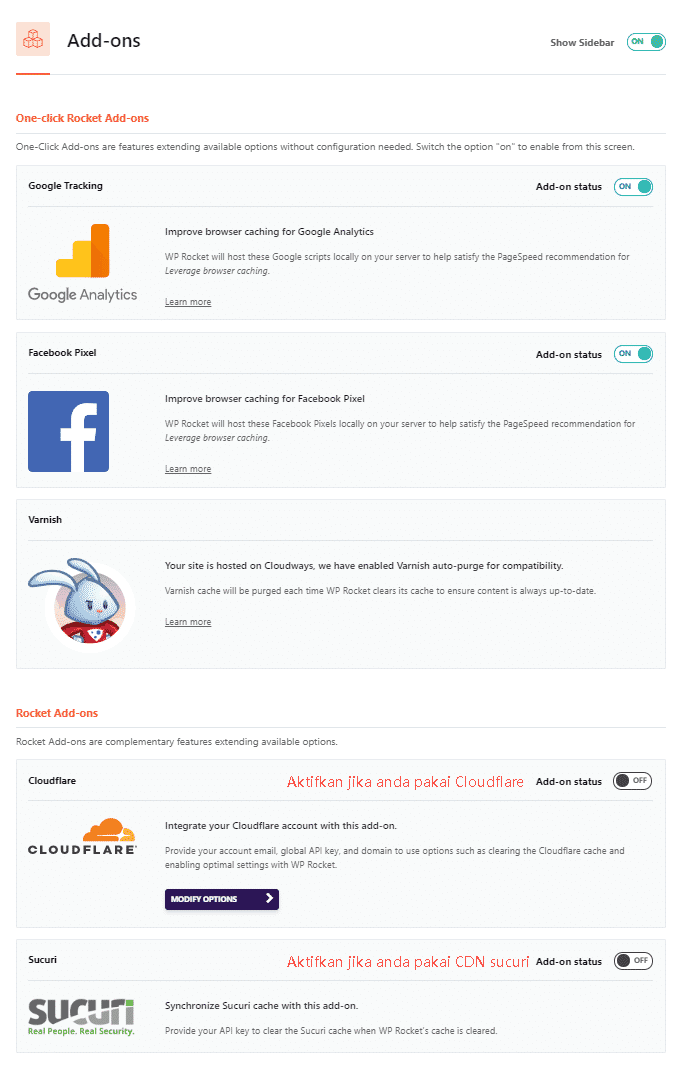
10. Add-Ons
If you use the services listed in this menu then enable this option.
10. Tools
In this menu, it is not for optimization but only for saving settings from WP Rocket if you forget the WP Rocket settings, you can import the settings you made before so that it saves you time to set up WP Rocket settings from scratch.
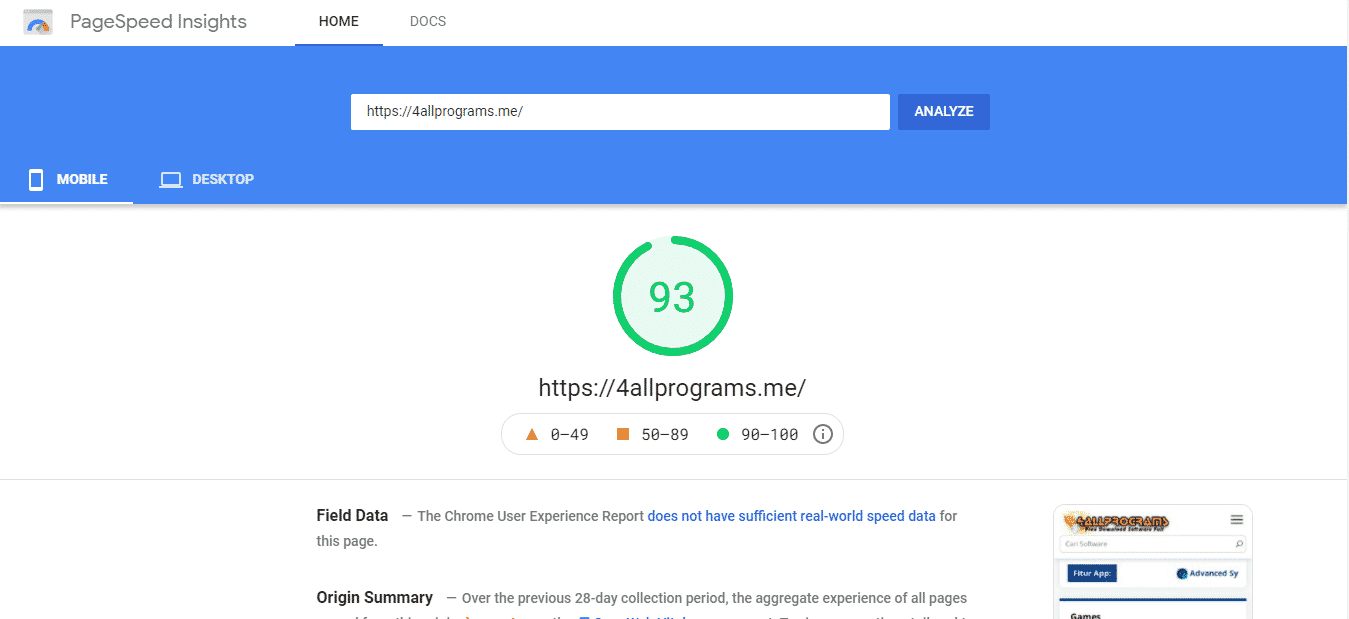
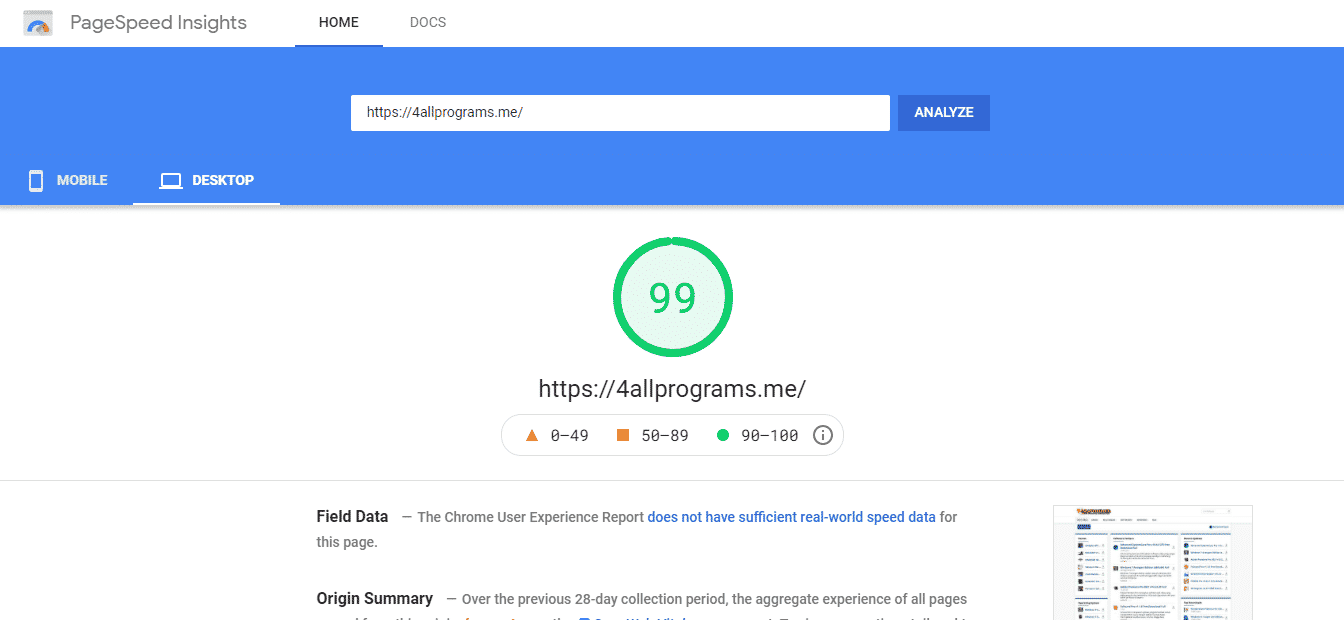
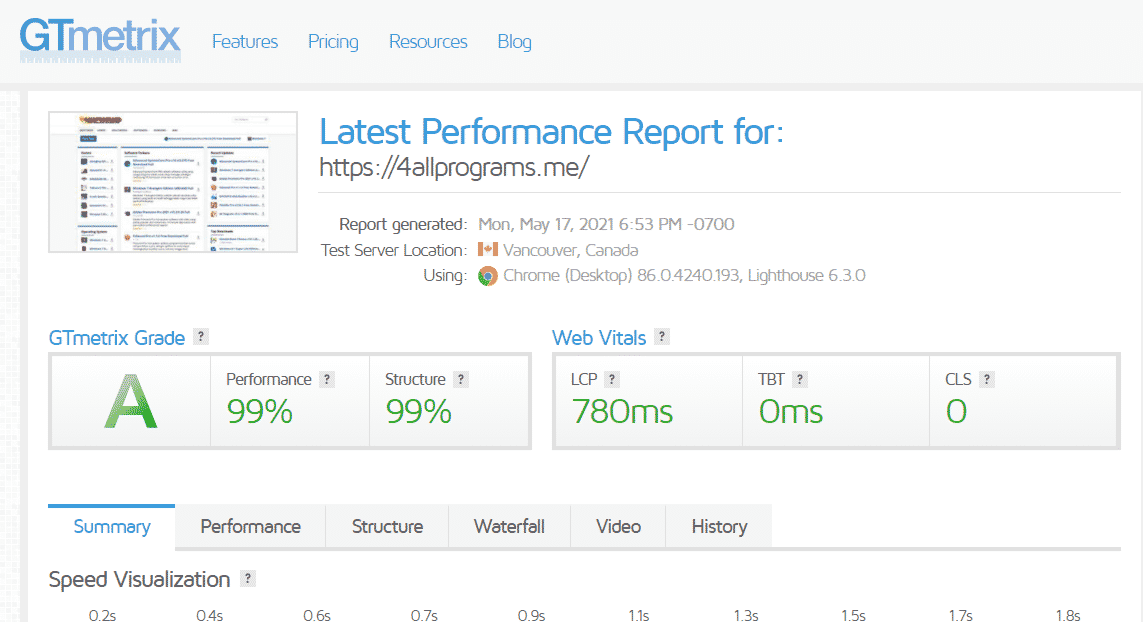
WP Rocket SETUP RESULTS for this site that you can see for yourself
Discover more from All Programs
Subscribe to get the latest posts sent to your email.